• Blogging
  • Technology News
  • How To
  • Webmaster Tips

The Web Files

Web site promotion and marketing info, Helpful Tips, Latest Gadgets, News and Webdesign Services

  • Home
  • Blog
  • Archives
  • Links
  • About
  • Contact

You are here: Home / Archives for How To

Preparing images for your WordPress Posts

March 1, 2007 by Tricia

So how do prepare an image for a blog post anyway?

I know that a lot of people have trouble figuring this out. I see a lot of sites out there with huge images in their posts that overlap the edges of the post section, or who’s photos must be so large that they slow the site down as they load.


There are a few ways to get an image in your post. You can upload your images to a free image hosting service like Flickr or Photobucket, or you can upload them directly to your post using the WordPress interface.

If you are going to upload your photos directly I would strongly suggest that you get some easy to use photo editing software. You do not want to upload huge photo files to your server and then include them in your post. Large file sizes will slow down the loading time of your site and frustrate your visitors.

Now when I suggest that you reduce the size of the photo I don’t mean the dimensions. I mean it’s actual size in kilobytes.

Think of it in human terms. There are tall people, and short people, slim and heavy. That’s dimensions. In photo terms you want to make a photo small enough to fit within your post without over-lapping the edges.

Then there’s the weight or kilobyte size of the photo. In human terms if you are getting a little pudgy you need to lose some weight right? Well, so do photos if you want them to load quickly on your site.

Using photo editing software you can keep the size of the photo but still make the actual file size (Kilobytes (KB)) smaller by lowering the quality level of the photo or converting it to a different format. For example if you have a jpg file you might try converting it to a gif to see if the file compresses and gets smaller in “weight”.

Ideally, you probably shouldn’t upload photos that are anymore than 20 to 25 kilobytes (KB) in size.

Now as to the size or dimensions of the photo – well you can change that directly in wordpress or you can use your photo editing software to make a wide file a bit smaller. The posting area of most blogs ranges from 300 to 500 pixels (px).

You can go into your blogs template – usually the CSS stylesheet, and read through the coding to find out how wide the body of the content area is. Use that information to determine the maximum width of a photo in a post. If you discover that the content area is 400px wide then you should try to make sure that any images you insert into your posts are no more than 400 px.

Now that you know a little bit about editing a photos size and dimensions prior to inserting it into a post, it’s time to learn exactly how to get that image in your post. Please read the next post in this blog for those instructions.


Filed Under: How To Tagged With: adding image to post, blog post, dimensions, image, image in blog post, kb, kilobyte, photo, photo editing, photo editing software, preparing image, size of photo

Use C-Panel to create email account

February 25, 2007 by Tricia

Creating an email account using C-Panel is a snap!

Log into your web hosting service and open up C-Panel. Once you are in c-panel:

1. Click on the icon that says MAIL

2. Once you are in there select – Add/remove/manage accounts

3 .Click Add account at the bottom of that page

4. Fill in the name of the email and the password. You can probably leave the quota alone. I think the default is 10 mb.

click on Create

At that point you’ll get some instructions on how to login to use that email account in webmail – use the same info to set up your email account in your email software.

Now wasn’t that easy?

Filed Under: How To Tagged With: c panel, create email account, email, email account, How To, set up email account, webmail

Fuelmyblog

January 25, 2007 by Tricia

Have you heard of Fuelmyblog yet? I believe this site went public sometime in December 2006. Fuelmyblog is a site where you can advertise your blog or myspace page absolutely free.

The creators of Fuelmyblog provide a page that is filled with 625 40 px X 40 px squares. To advertise your site simply visit Fuelmyblog and select whichever square that you’d like to advertise your blog on.

When you click the square a pop-up will ask if you’d like to ADD that square. Select the word ADD and fill out the form on the page that comes up.

You can supply an image that is no more than 500 kb in size. It will automatically be resized to 40 x 40 px, or if you don’t have a photo to use for your site you can select from a number of free images.

Once you’ve completed the information page you’ll be able to pre-view your square, if it looks fine submit the form. When you view the site after filling out the form you’ll see that the square you’ve selected now has an X in it meaning that it’s reserved for your space.

Usually within only a few hours you’ll find that your site is up and being advertised on Fuelmyblog.

This service is completely free. It was created as a way for people to find interesting blogs.

At the time of writing there are only 213 squares left on the main page. There are many more unfilled squares on their feature pages – More, Business, Life, and All Sorts.

I listed several of my sites on Fuelmyblog a couple of weeks ago, and when I look at my site stats I can see that I’ve been getting a few visitors each day from Fuelmyblog, for each of the blogs that I listed.

So what are you waiting for? Get over to Fuelmyblog before all those squares are filled up!

Filed Under: How To, Site Promotion Tagged With: free advertising, free advertizing, Fuelmyblog, list blog, list myspace page, Site Promotion

Expandable menus

October 30, 2006 by Tricia

Have you noticed how the menus on my side bar roll up neatly? The automatically expand when you click the + sign beside the title of the menu.

If you’re wondering how I did that simply go to the Flooble website’s script section and select the Expandable Menu script. Just follow the directions, changing the text and background colors to suit your blog and within a few minutes you’ll have the code for the expandable script to put on your own website.

You need to make a new script for each menu that you create, but once you’ve made the first one with your customized colors it’s very easy.

Filed Under: How To, Site maintenance Tagged With: drop down, Expandable menu, Flooble, How To, instructions, menu, Script

Adding a blogroll to Blogger

October 23, 2006 by Tricia

The following instructions work for the old version of blogger. I’m not sure yet if they work for new blogger. If someone would let me know I’d appreciate it. These instructions also work for blogcharm and other HTML based templates too.

  • Go into your dashboard and make a new post (post like you would if you were blogging an entry).
  • In that post, insert the script shown for the blogroll. Publish. IGNORE errors when you publish it – because blogger will give you an error.
  • Next, grab the link to that page (go into your blog, find that post, go to the specific page – grab the permalink and copy that URL of the permalink). Take that URL and put it in your sidebar link this: [a xhref=”LINK”]name of blogroll post[/a]
  • Insert your permalink where I have LINK.
  • This will put the blogroll on a page and will not clutter up your sidebar to slow down loading time.
  • Change the date so the blogroll isn’t on your main page. Open the post, at the bottom of the text box where it says > Post/comment options – click there, change the date if you don’t want it to be the first post (backdate it).
  • Publish.

Filed Under: How To, Site maintenance Tagged With: Add blogroll, adding blogroll, Blogger, Blogroll, How To, HTML blog, instructions, permalink

Adding a blogroll to WordPress on own domain

October 15, 2006 by Tricia

These instructions are for adding a blogroll to WordPress on your own domain. At this time we haven’t figured out how to add a blogroll to a wordpress.com blog, but it’s fairly easy to add one to WordPress that is hosted on your own domain.

To put the blogroll code on a single page:

Go to the USER section on your DASHBOARD, and scroll down the user page until you find an area called PERSONAL OPTIONS – this will be in the lower left. Un-check the box beside “Use the visual rich editor when writing” and save options. You will now be writing your page in plain text.

Go back to the writing section and select WRITE NEW PAGE.

Give your page a title and perhaps use an image that might be supplied with the blogroll code that you are about to add to your site. Adding an image will create a nice looking header above the list on your new blogroll page. You can also link the image that you use to the home url of the blogroll that you are adding.

Paste the blogroll code into the page. The blogroll code will not work if you are writing in Rich Text so please be sure that you have done the very first instruction that I listed and switched to plain text mode.

Save your page and check to make sure it’s working.

You could also put the code in your sidebar:

Go into your WP admin section and select PRESENTATION, then select theme editor and select the correct theme.

Once you have opened the theme that you are using, you’ll find that the theme is open to the CSS Stylesheet file but all the other files that belong to the theme will be listed on the right.

You want to select your SIDEBAR page.

Find an appropriate place in your sidebar for the blogroll code. You can put an image header above the blogroll if you like and then past the blogroll code into your sidebar. You may have to enclose the blogroll code with list tags < li > < / li > or < div > < / div > (no spaces between selected li or div codes, blogroll code should go in the middle of either of these codes. )

If you’ve posted the code in correctly you should have a new blogroll in your sidebar. If by chance the blogroll isn’t working go back and make sure that there are no spaces in the code. Usually the only space in the code is right after SRC.

I hope that you’ve found this information helpful.

Filed Under: How To, Site maintenance Tagged With: Add blogroll, Blogroll, How To, instructions, Wordpress, wordpress own domain

Adding a blogroll to Typepad

October 8, 2006 by Tricia

I run some blogrolls of my own on my other sites and I’ve found that a number of people have no idea how to add a blogroll to their site. Even though I haven’t used all of the different types of blogging platforms I’ve learned from my blogroll members how they finally managed to add the code to their sidebar.

To make things easier for you I thought I’d post the instructions for Typepad users here.

Charles from Deuces Stay Wild figured out this one for us:

1. In TypePad, create a Notes typelist.

2. Name your list – perhaps “Wordless Wedneday” or whatever the name of the particular blogroll happens to be.

3. Next you click the “add new item” button

4. Then in the “notes” section you paste the blogroll code – that’s the code that begins with the word script.

5. Next you save the changes.

6. After saving your changes you must go to your edit design page

7. And then to change content selections

8. Once you are on the change content selections you select (check the check-box) your new typelist, which in this case is whatever you just named the new blogroll.

9. Save your changes and you are done!

I don’t use Typepad and as a result if you have further questions I won’t be able to answer them. Sorry. However, if you know of an easier way to add a blogroll to Typepad please feel free to tell me your method.

Filed Under: How To, Site maintenance Tagged With: adding blogroll, Blogroll, How To, instructions, typepad

How to add a blogroll to B2Evolution

October 3, 2006 by Tricia

Apparently adding a blogroll to B2evolution is a pain in the hinny. I don’t use that blogging software myself, however one of my blogroll list members was kind enough to have helped me out by giving me the instructions.

The first thing that you need to do is got to your Admin area and click on the Templates tab.

  • Then you will need to select:
  • “_main.php – This is the main template. It displays the blog.”
  • Once you are on main.php, figure out where your sidebar is located in the coding. Look for the words “START OF SIDEBAR”
  • Scroll down until you reach the end of the Side Bar Coding which often ends with an href link to B2evolution and a B2evolution image link.
  • Hit enter twice after the end of the B2evolution link code which ends with an ending paragraph code < / p>
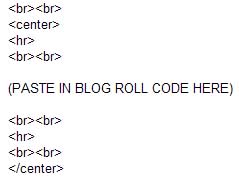
  • Then add the following code:

    b2evoinstr.jpg

  • Save your work at that point and check your page. You should have a blogroll or whatever else (image?) that you pasted into the sidebar code area.

NOTE: If you are using a custom design you will need to edit the _main.php file in the folder that contains your skin.

I hope that you’ve found this information helpful. Remember, I do not use B2evolution so I won’t be able to answer many questions on this if you have any. I’m just trying to be helpful.

Filed Under: How To, Site maintenance Tagged With: adding blogroll, B2B, B2B evolution, blog software, Blogroll, How To

  • « Previous Page
  • 1
  • 2
  • 3

Connect with Us

  • Facebook
  • Flickr
  • Instagram
  • Pinterest
  • RSS
  • Twitter

Categories


Eavestrough Cleaning Toronto

Recent Posts

  • Top Social Media Automation Tools Designed For Marketers
  • Social Selling: The Right Way to Sell Through Social Media
  • When in Doubt Turn to SEO Consulting
  • Considering using Guest Bloggers
  • Can you make money blogging? Yep
  • The World Of Blogging
  • Internet Marketing And Permission-Based Email Marketing

Recent Comments

  • Locked out my own sites by Bad Behavior plugin — The Web Files on The War on Comment Spam
  • AspDotNetStorefront E-commerce shopping cart — The Web Files on What Are The Best Ways To Make Money Using A Blog?
  • I changed my do follow plugin to Lucia’s Linky Love — Tricia's Musings on I’m not against website urls – I’m against comment spam
  • diagnosing comon windows errors on It’s important to backup your data regularly
  • Parol on Social Selling: The Right Way to Sell Through Social Media

Shopping

Gifts, Gadgets, computers and More! At our Amazon store.


Site Stats


Meta

  • Log in
  • Entries feed
  • Comments feed
  • WordPress.org

Archives

Blogroll

  • Eavestrough Cleaning Toronto
  • The Career Strategist

Other Sites

  • You are in My World Now
  • Get WebStyle
  • Amphibian Care
  • Celebrity Scoop
  • Truly Odd Planet

Search our Site

Pages

  • About
  • Archives
  • Become a Guest Blogger at The WebFiles
  • Blog
  • Canadian Bloggers
  • Contact
  • Disclosure
  • Do Follow Bloggers
  • Links
  • Privacy Policy
  • Toronto Bloggers

Tags

Affiliate article articles blog Blogger Blogging Blogroll blogs business comment comments computer CPU design easy email features Google How To install instructions Internet internet marketing Keyword page rank plugin plugins posts problem resources search engine SEO sites Software tech traffic Video visitors Web web host website Wordpress Wordpress Plugin write writing

Copyright © 2025 · News Pro Theme on Genesis Framework · WordPress · Log in